System Requirements and Compatibility
Tau is very efficient and doesn't require powerful hardware. It runs great on every Mac, iPhone and iPad, or PC. However, it needs a fairly modern operating system: macOS 14 (Sonoma), iOS 17.4 or Windows 10 (19041) at a minimum. Features, performance and quality are the same across all devices.
Compatible audio file formats:
- MP3 (MPEG-Layer III)
- AAC-LC (.aac or .m4a)
- STEMS (by Native Instruments)
- WAV
- AIFF
- ALAC (Apple Lossless)
To save your audience from bad audio quality, Tau does not support the following audio file formats, as they are typically used for voice calls or low bandwidth:
- MP3 Layer II (two), sometimes labeled as MP2.
- HE-AAC
Additionally, DRM-protected files cannot be used because DRM protection creates a secure audio pipeline that doesn't allow free audio transformations, which is the core of DJing.
Metadata support in the audio files: ID3, Traktor (bpm/beatgrid/hot cues/loops), Serato (bpm/beatgrid/hot cues/loops).
Storage Space
Tau doesn't need much storage space, typically less than 1 GB for very large libraries. It doesn't have a noticeable impact on your cloud storage or network data usage.
Always keep 1 GB of free space for smooth operation. This is not specifically for Tau, but for all applications, as operating systems need this room to operate without any hiccups.
Keep free space in mind before recording. One hour of recording requires around 700 MB, plus you need 1 GB for smooth operation, totaling 1.7 GB of storage space for a glitch-free 1-hour recording.
User Interface
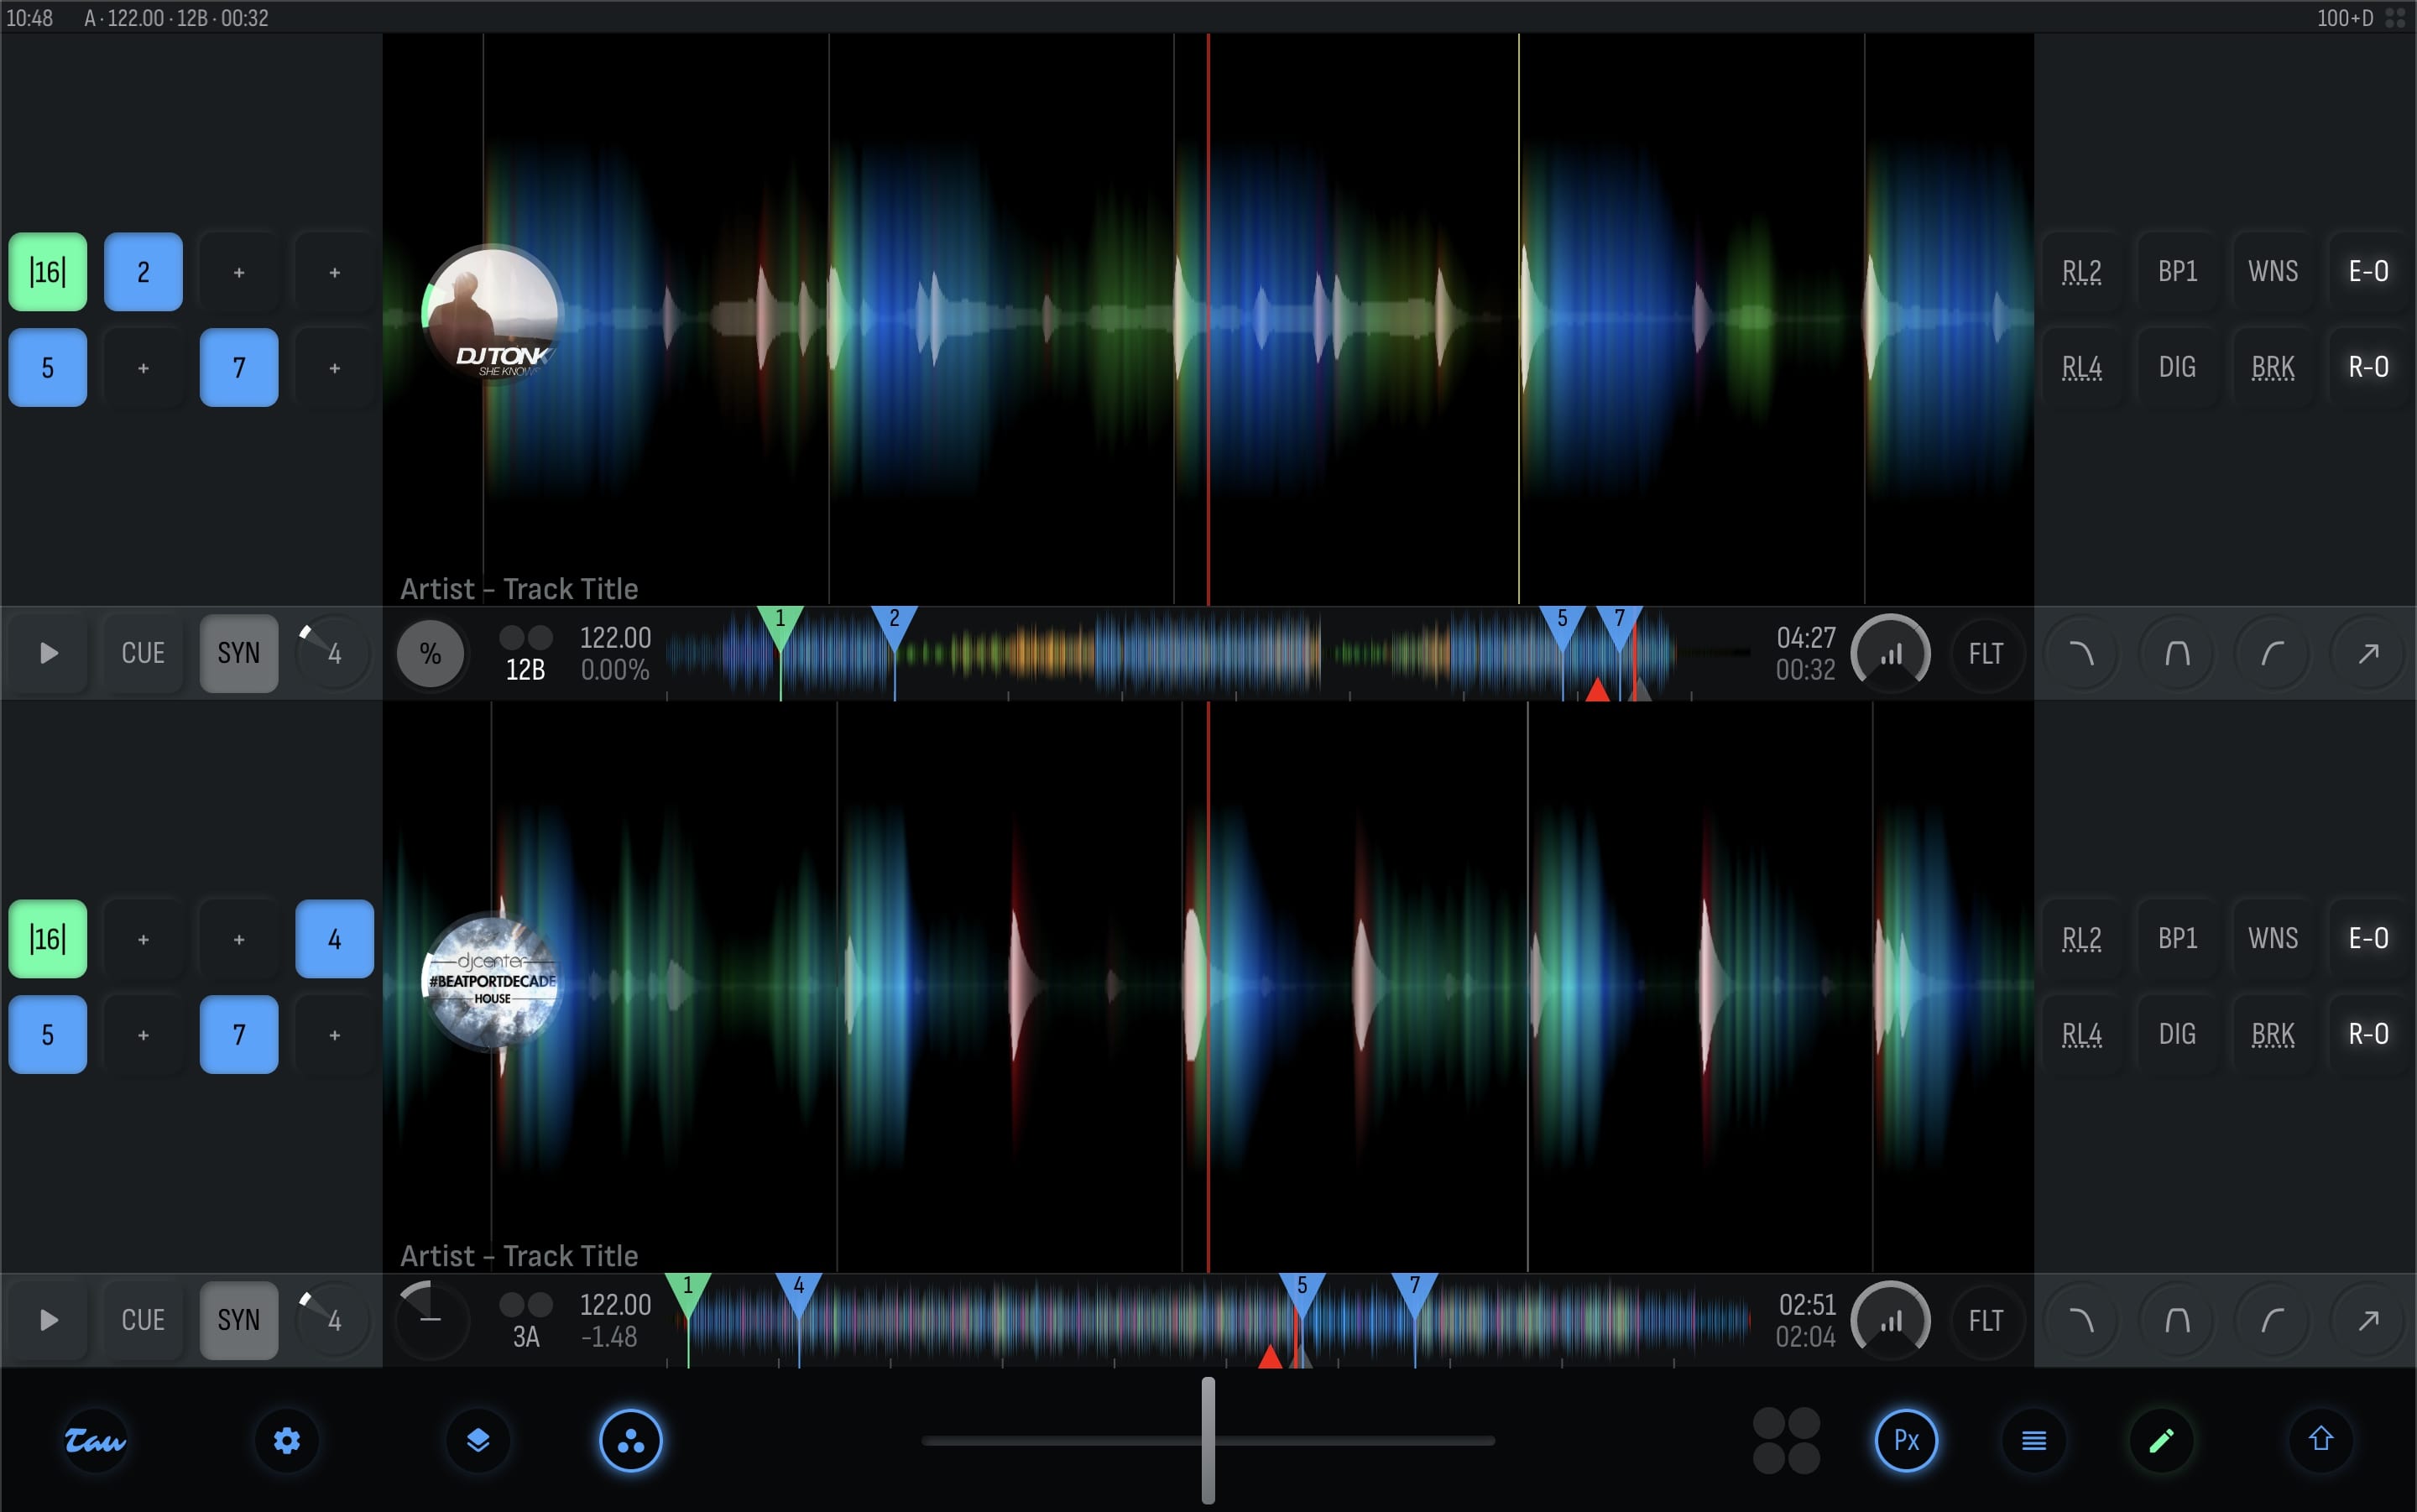
The status bar is always visible at the top and may display helper information along with the clock, master deck information, recording time, battery level, and master output level.
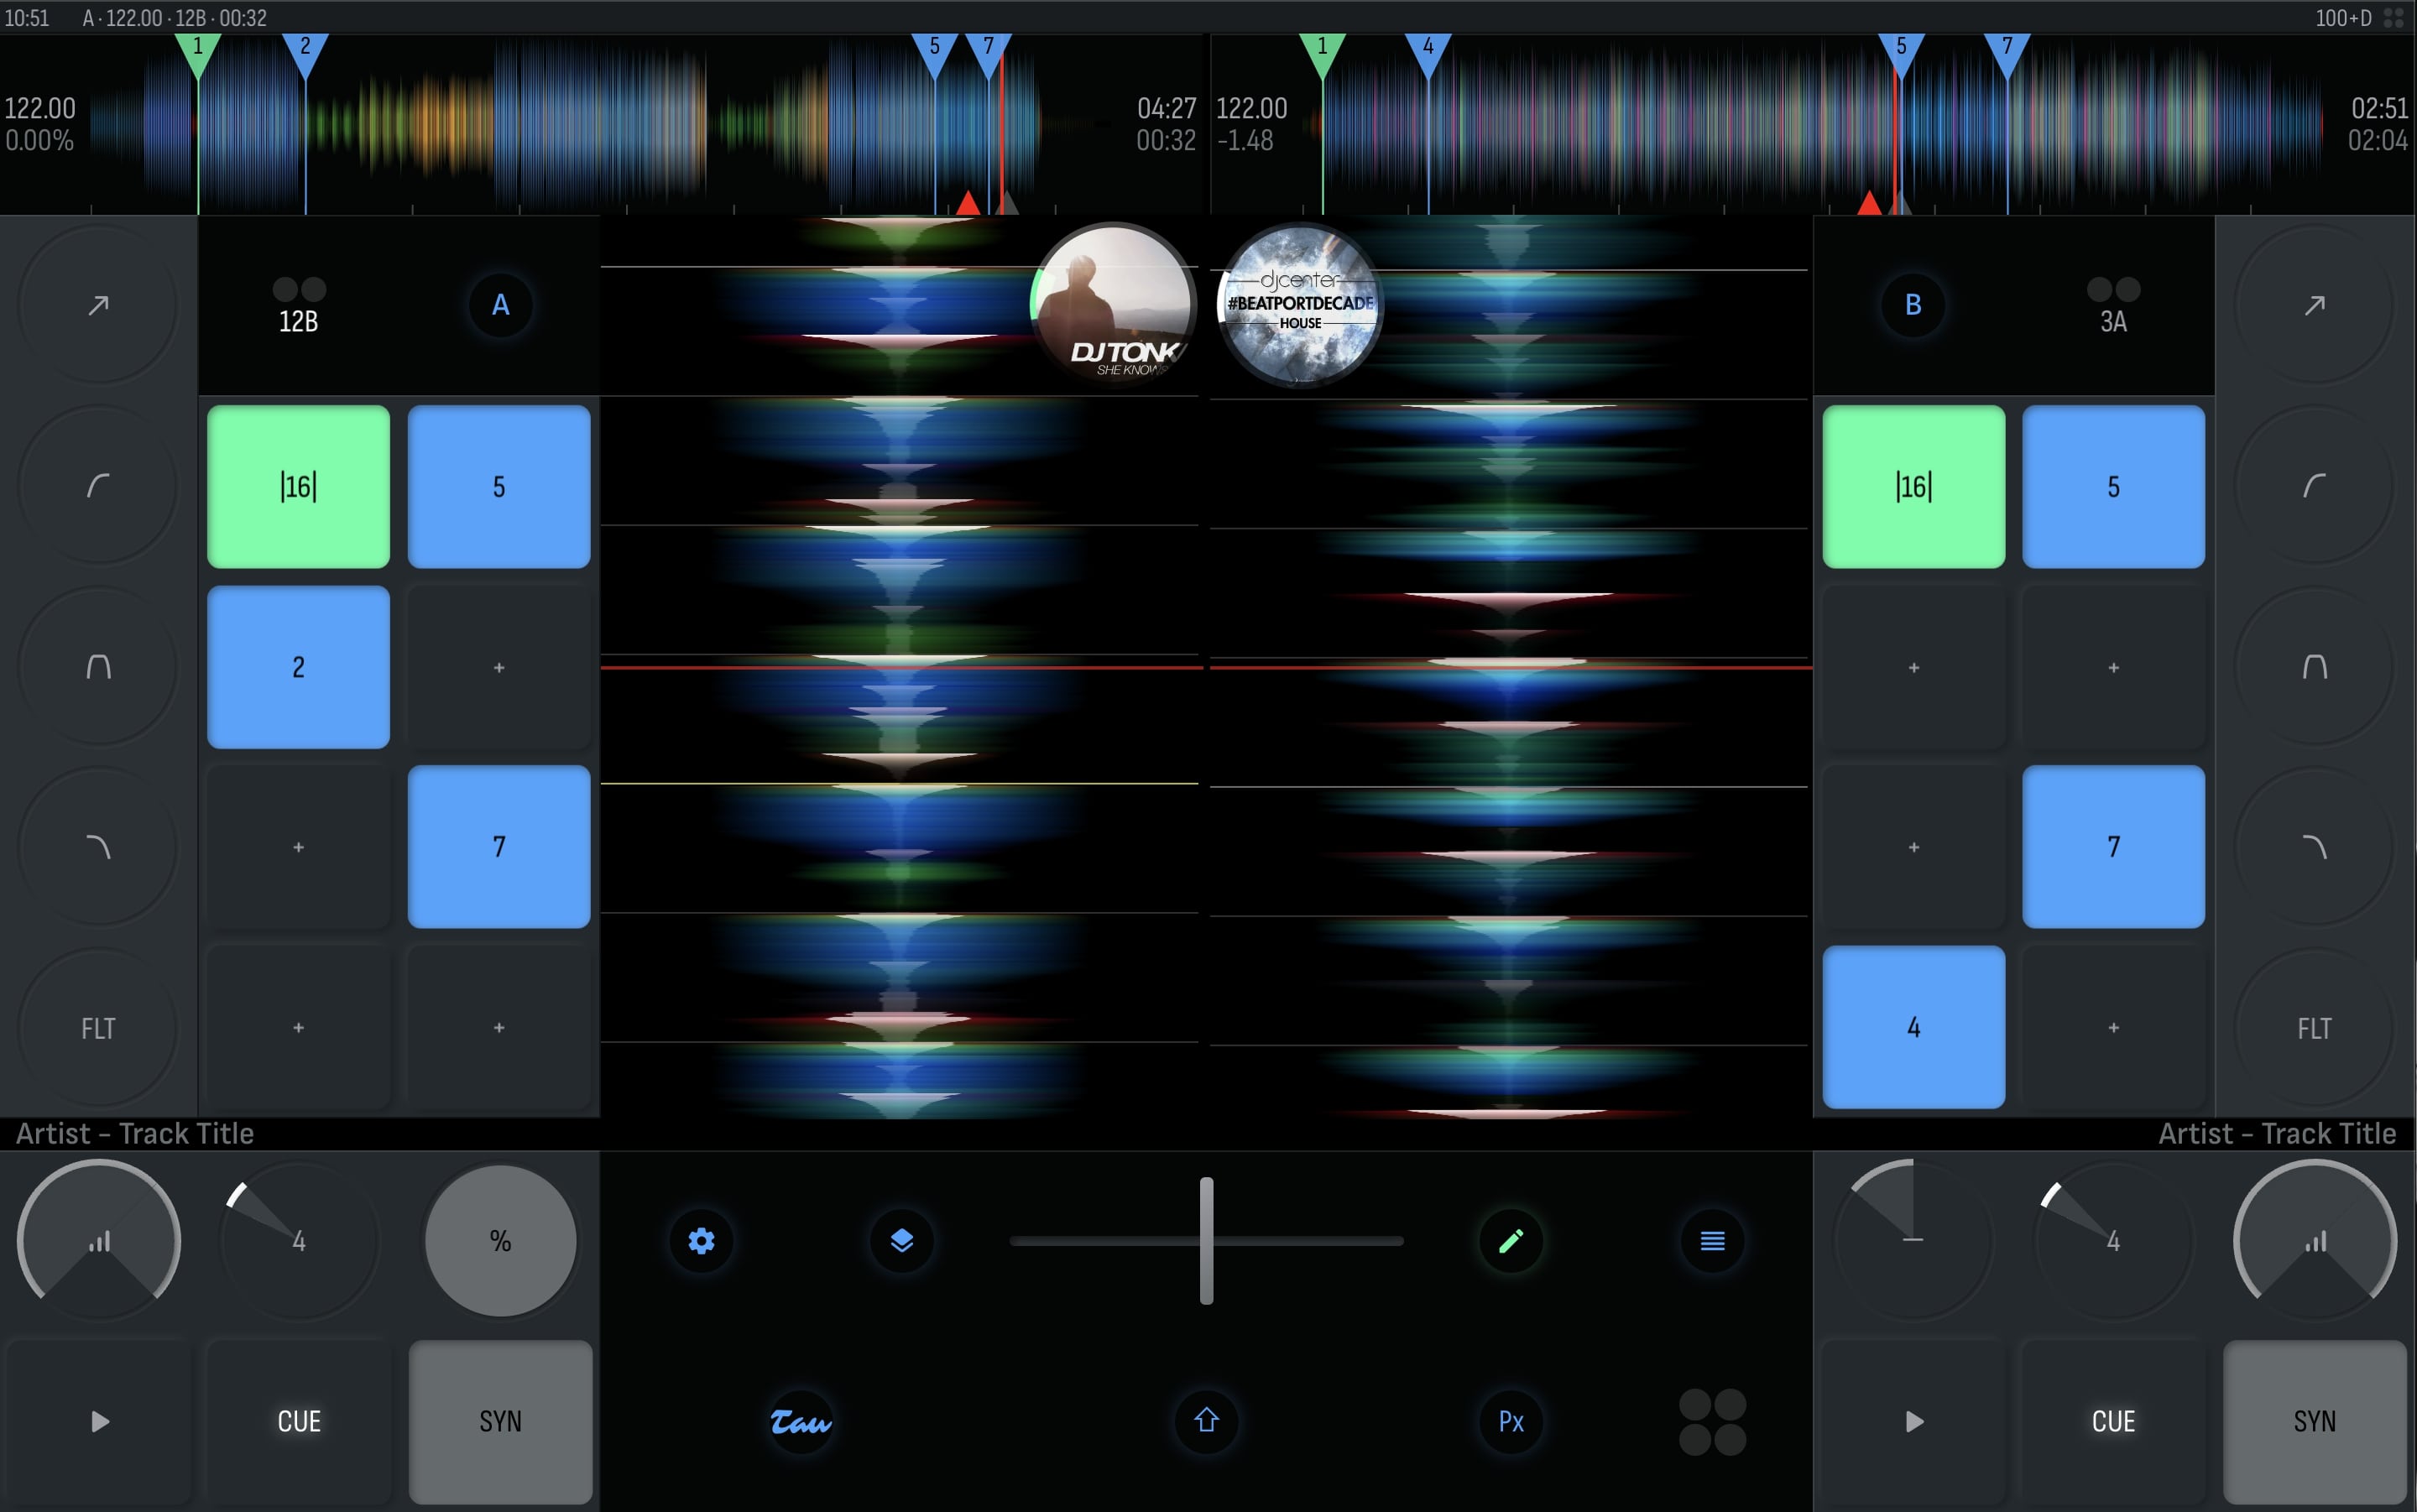
Decks And Layouts
Tau supports 2 or 4 decks and offers five user interface layouts:
- Default Horizontal (wide window, landscape)
- Default Vertical (wide window, landscape)
- Two Hands Horizontal (wide window, landscape)
- Two Hands Vertical (wide window, landscape)
- Two Hands Portrait (tall window, portrait)
The "Two Hands" layouts are optimized for touch-screen use with large controls and two-handed operation, but they can only show 2 decks at a time. The Default layouts can show all 4 decks at once.
Getting Around
The buttons with blue icons open or close various screens and panels.
| logo | Full screen track browser. |
| settings | Settings. |
| layers | Layout. |
| workspaces | Cue points. |
| Px | Pad effects (pad fx). |
| reorder | Stems panel. |
| edit | Beatgrid editor panel. |
| more_horiz | The shift button. Hold it to use secondary features. |
Deck/Player
| play_arrow pause power_settings_new |
Play/pause. shift Turntable motor break effect (stops in 1 beat). shift + long click Turntable motor off effect (stops slowly). |
| CUE IN LSP |
paused on the cue point Hold to temporarily start playback, release to return to the cue point. If you press play while holding it or move your finger to the play button, playback will be continuous.
paused or shift Set the cue point to the current position.
shift + triple click Set the cue point + beatgrid to the current position (quick beatgrid).
shift + looping Loop-Sync-Play: to mix variable tempo songs with fixed beatgrid (modern) music, this feature turns off sync, sets the tempo based on the length of the current loop and jumps to the cue point. A small, looped part of a variable tempo song can be mixed this way.
|
| MAN TPO SYN SN+ OUT ADJ |
Change sync mode.
hold Set the master deck.
shift Start looping between the cue point and the current position.
shift + looping Adjust the beginning or the end of the loop.
|
| 4 REV |
Click for loop on/off, move to change loop length.
shift Change playback direction.
shift + hold Change playback direction until you release the button.
|
| % |
Change the tempo.
shift Change the tempo in smaller steps.
double click Reset tempo.
This knob is highlighted when this deck is the master deck.
|
| meter, key |
Shows the current key and vu meter.
click Open the settings panel for this player.
|
| signal_cellular_alt Fx |
Channel volume fader.
shift Open the main effects panel over this deck.
|
| FLT FLT |
Color fx.
shift Select color fx.
|
| eqlow | Low eq. Double-click to return to the middle. If you hold shift and enable C-B (below the crossfader), the low eq will automatically cut the bass with the position of the crossfader. |
eqmid
aspect_ratio | Mid eq. Double-click to return to the middle. shift Waveform zoom level. |
| eqhigh | High eq. Double-click to return to the middle. |
| north_east headphones |
Gain.
shift Pre-listening.
|
Overview (Small) Waveform
| swipe/move |
Strip Search
Jump immediately to the location.
|
| shift + click |
Beat Jump
Jump by the number of beats displayed on the loop knob.
|
| swipe/move |
Preview Search
If Preview Search is enabled in settings/player, you can swipe/move on the Overview Waveform for rough adjustments and use the Main Waveform for precise adjustments before jumping.
|
| BACK | Cancel Preview Search. |
| JUMP | Jump to the Preview Search location. |
Please note the status of the sync button. In SYN mode, jumping maintains the current beat number. If the music is looping, the loop will also be "transferred", with the position inside the loop preserved.
Main (Big) Waveform
paused + move
shift + move |
Scratch
Move the waveform to scratch.
|
| paused + click |
One Frame Move
Click on the left or right (top or bottom) half to move by a little.
|
| playing + hold |
Pitch Bend
Click on the left or right (top or bottom) half for pitch-bend.
|
| playing + swipe |
Vinyl Nudge
"turntable-like" pitch-bend.
|
Artwork Image (Vinyl)
| click |
Open Track Browser
Below the players or over the player.
|
| hold |
Eject
After the artwork turns to red color, release and click again to eject the deck.
|
| move |
Instant Doubles
Move the artwork above another deck to trigger the instant doubles feature.
|
Player Settings Panel
How to get here: click on the vu meter/key of a deck.
| Waveform | Colored, 4 waves stack, classic. |
| Slip Mode | When Slip Mode is enabled, scratching and reverse playback are performed "on-the-fly", without losing the natural progression of a track. When scratching or reverse playback is finished, playback continues from the position where the track would have been if the scratching or reverse playback had not occured.Please note that Slip Mode works for maximum 64 beats. |
| Key Lock | Also known as Master Tempo. When enabled, changing the tempo of the track will not change its tone (no "Mickey Mouse effect"). |
| Key | Change the tone of the song (useful for harmonic mixing). |
| Fuzzy Key | Key sync using the "fuzzy key" technique. |
| Formant Correction | Reduces the "Mickey Mouse effect" for vocals. Use this for accapellas only, never for music. |
| Tempo Range | Range of the tempo control. |
Sync
There is always one master deck, and the other decks will synchronize to the master deck's beatgrid. The master deck can be manually set by holding the sync button, but by default, Tau will also set it automatically (you can turn this off in settings/player). Tau supports 4 different sync modes:
| SYN | Beat + tempo sync. In other DJ software, this is often handled as "quantization" and having "sync" enabled. |
| SN+ | Beat + tempo sync + pitch bend. If the beatgrid is not aligned perfectly for a mix, use pitch bend to correct it. This offset is then applied to all synchronizations. Click to button to reset. |
| TPO | Tempo (bpm) is synchronized only. |
| MAN | Sync off, manual beat-matching. |
Beatgrid
How to get here: edit
| 128.00 | The original bpm of the track. Click to double or halve it. |
| - | Decrease bpm. |
| + | Increase bpm. |
| TAP |
Tap along the beat, which is often enough for Tau to find the correct beatgrid. |
| |< | Move the grid to the left. |
| >| | Move the grid to the right. |
| AUTO | shift Returns to Tau's very first, fully automatic guess. |
| >|< | shift Set the grid to the current position. |
| metronome | shift Enable the metronome. I use this all the time. It provides an audible tick at every beat position. I always set my beatgrids to align perfectly with this, ensuring accurate results regardless of genre or kick drum type. |
Super-Quick Beatgrid Fix
When the detected bpm value is correct but the beatgrid is off, Tau offers a quick way to fix the beatgrid:
- Move the waveform to the position where a bar (a 4-beats long sequence) should start. This is often where the first bass drum kicks in.
- Hold shift and triple-click the IN button three times (CUE button on MIDI controllers).
This action corrects the beatgrid and sets the cue point simultaneously.
Songs with variable tempo, live songs
Tau supports only a fixed beatgrid, where the distance between beats is consistent. However, older or live songs may have variable tempo. Here are several ways to handle such songs:
- "Warp" the song to a fixed beatgrid using software like Ableton.
- Download a pre-warped version of the song from a site like Remixplanet.
- Beatmatch manually, which is a fun skill to learn.
- Use the Loop-Sync-Play feature. Create a loop where the song is mixable and its tempo is relatively stable. Even a single beat will do. Then SHIFT + CUE to play it at the right moment, and Tau will adjust the tempo automatically.
Points
How to get here: close other panels in a Two Hands layout, or in a Default layout use: workspaces
This panel has eight buttons for hot cues/loops. A hot cue functions like a bookmark, and a loop is similar but has an end point.
| 1 ... 8 |
Trigger the hot cue/loop.
If the music is paused, it will only play until you release the button.
Drag the point over the play button for continuous playback.
shift Delete the hot cue/loop.
|
| + |
Save the current position or loop. Please note the status of the sync button. In SYN mode, your points will snap to the closest beat. |
Stems
How to get here: reorder
| 1234 | Volume control for each stem. |
| ON Fx | Quick mute for each stem. double-click Solo mode. shift Route stem to color fx and main fx. |
Effects
Tau offers three independent effect (fx) features: color fx, main fx and pad fx.
Color Fx
The classic filter knob has been enhanced to include color Fx. It's always a per-channel (per-deck) effect, accessible via the always-visible color fx knob. Hold shift to choose from the four available sounds.
| FLT | Low-pass filter (left), high-pass filter (right). |
| L-J | Lofi/bit crusher (left), jet/flanger (right). |
| G-R | Gate (left), roll (right). |
| E-W | Echo (left), white noise (right). The leftmost position of echo is echo-out. |
Main Fx
Change color fx and main fx parameters. How to get here: shift Fx
The main FX is a single effect unit that can process audio from one or more decks. It offers echo, echo + filter, reverb, reverb + echo and roll effects.
| WET | The strength of the main fx. |
| ON | Main fx on/off. |
| 1/2 | Echo beats, reverb room size or roll beats. |
| DCY | Echo decay, echo filter frequency, reverb damp or room size. |
| MFX | Open the main FX settings panel to adjust the main effect, routing, and some sound options. |
| CH | Quick routing selector. |
| CFX | Color fx parameter: filter resonance, flanger depth or white noise volume. If filter resonance is at the rightmost position, the filters will have a dynamically adjusted resonance curve. |
| FLT | Color fx selector. |
Pad Fx
16 pre-defined effects, triggered by a simple push of a button. How to get here: Px
| RL2 ... R-O |
Pad fx on/off.
hold Pad fx until you release the button.
drag Change pad fx on-the-fly.
|
Hold Shift to reveal an additional set of pad effects. You can also change the position of the pad effects in settings/player.
Track Browser
| close | Close the Track Browser. |
| source | Choose from various locations/libraries such as the Apple Music Library, USB drives, Rekordbox, regular folders and history. |
| insights | Analyze tracks in the current list (and optionally, all subfolders within). Choose to keep or overwrite existing metadata and set BPM ranges. Analysis can be performed in the background during your DJ performance as well. |
| content_copy | Copy the contents of the current list to the clipboard, so you can use it in a text editor, for example. |
| splitscreen | Split view. What's better than a track browser? Two independent track browsers! |
| title ... join_inner | Change the order of the track list by bpm, artist, title, comment, time, key, rating, date, similarity to the master deck, or keep it as-is.
|
| search | Search all libraries simultaneously. Use "or" between multiple words to expand. For example, "radio mix" will only match tracks including "radio mix" in their information, but "radio or mix" will return every track with "radio" or "mix". |
| headphones | Enable track preview. |
Bpms relatively close to the master deck are displayed in green, as well as perfectly matching keys. Partially matching keys are highlighted in blue. Additional controls appear if you select a track:
| headphonesfast_forward | If track preview is enabled, jump inside the track with this. |
| album | Quick load button. Available in two-deck mode when the master deck is playing. Clicking this button loads the selected track onto the non-master deck, ensuring you don't accidentally load something onto the master. |
| A B C D | Load the selected track onto a deck. |
| deselect | Deselect the current item. |
Apple Music Library
Tau has read access to your Apple Music library; therefore, you need to manage your tracks and playlists in the Apple Music app.
Please note that Apple Music may store many of your tracks in the cloud. However, Tau can only read fully downloaded, offline music. Make sure in the Apple Music app that all music (or entire playlists) you want to use are downloaded.
Apple Music offers a vast catalog of tracks beyond your own library. These tracks are copyright-protected and can only be played in the Apple Music app. You must purchase or upload a track to play it in Tau.
Files, Folders
Tau fully supports traditional folders, files, USB drives, etc., for handling music. After you set a location in the app, it will quietly discover it in the background by scanning your audio files for metadata such as artist or title.
This process may be slow if your storage device is slow, so always try to use fast USB drives or fast USB connections, for example. Tau will also save the data it discovers directly into folders in "taumeta1.txt" files. Please do not delete these files, as Tau will need to process everything again otherwise. The taumeta1.txt files are quite small anyway.
Rekordbox USB, Rekordbox App
Tau can access your Rekordbox USB exports and also the Rekordbox Application's database. It supports Device Library Plus. Playlists, artwork, cue points, beatgrids, keys and more information are read. Tracks can be loaded just like on a CDJ.
Two Rekordbox USBs can be used simultaneously, allowing seamless transitions between DJ libraries. On macOS and Windows, Tau can also read the Rekordbox application database directly, without requiring a USB export.
Dropbox, NAS and Network Storage
Tau fully supports these using the files and folders method described in the previous section. Simply make these drives visible in your system first, such as by adding them to Locations in the Files app on iOS or mounting them in macOS.
How to use Dropbox on iOS: install Dropbox, add the Dropbox folder to Locations in the Files app, set up the folder in Tau.
How to use Google Drive on iOS: install Google Drive, add the Drive folder to Locations in the Files app, set up the folder in Tau.
See the pattern above?
Database, Cloud Folder
Tau stores your bpms, keys, beatgrids, hot cues, and loops in a single database file (.db) app's documents folder. Manage and view your data in this panel.
| Played Tracks Lookback Hours | Determines how far back the track browser will search for previously played tracks. |
| Reset Played Tracks Info | Use this to mark all tracks as "not played". Don't worry, this action does not erase the history. |
| Import | Import metadata from DJ Player Professional, the Rekordbox app or a Rekordbox USB. Rekordbox access is separate from Tau's database. Metadata in Tau will not be overwritten for the same track. This option allows you to import metadata from the Rekordbox database. |
Track Metadata
Tau identifies music by artist, title, and duration metadata. When importing a track into your music library, always check (and possibly correct) the artist and title information, and do not change them afterward!
For users of Mixed In Key: Enter your metadata in the comment field, not in the artist or title fields.
Cloud Folder
Tau can back up your database and MIDI maps to a designated folder. This feature is called "Cloud Folder" because this folder is typically stored in the cloud. I recommend using a folder in Dropbox.
You can use this folder across multiple devices to synchronize all apps with the same data. However, only one instance of Tau can access this folder at a time. Make sure to close Tau on your other devices!
I understand that this feature is not a super-advanced cloud solution, but I prefer to focus on true DJing features rather than maintaining a complex cloud architecture.
Please note that data from your Cloud Folder will overwrite your local data.
Recording
Hold shift and use the REC button to start/stop recording.
Recordings are saved to "Tau Documents, Recordings" in stereo WAV format. Next to the .wav file, there will be a text file with artist, title and timing information. Tau does not display text files in the track browser, but you will see them in the Files or Finder app.
Please ensure you have enough storage space for your recording! One hour requires around 700 MB.
Internal Mixer Recording
Ensure you adjust your track's playback volume to stay "in the green" while recording. This provides excellent uncompressed audio quality and sufficient headroom for mixing and mastering. It's okay to temporarily go into the yellow or red while transitioning from one track to another.
External Mixer Recording
In the external mixer output configuration, you can record audio incoming on a USB stereo input channel, which you can set in settings/input. If it's working properly, the External Mixer Recording Signal Strength indicator will show you the input level.
Settings
How to get here: settings
Mixer
| Master Volume | This controls software volume only. It does not adjust the hardware volume of your device's built-in speakers, for example. |
| Booth Volume | This controls the secondary master output. |
| Balance | The balance of the master and booth output signals. |
| Disable Fader Start | Disables automatic deck playback triggered by moving a channel fader or the crossfader while holding Shift. |
| Pre-listening Volume | Controls the volume for your headphones. Note that 50% represents maximum device capability. The range from 50-100% is for emergencies and may distort the signal. |
| Master In Pre-listening | Determines how much of the master signal is mixed into the pre-listening output. On most hardware mixers and controllers, this is the "cue mix" knob. |
| Master When Off | If enabled, the master signal will be audible when nothing is playing in pre-listening. |
| Split | Sends the master signal to the left side and the pre-listening signal to the right side of the headphones. On some hardware mixers, this is the "cue split" switch. |
| Auto Select | Automatically manages pre-listening switches. |
| Crossfader Curve | Adjusts the crossfader response: Mix for standard volume fade, Smooth for equal loudness curve ideal for smooth transitions, and Scratch for sharp on/off transitions, suitable for turntablist techniques. |
| Crossfader Assignment | Sets crossfader sides (left/right) for each deck or disables it (thru). |
Player
| Quantize | If tempo and beat sync are enabled, snaps to half, one, two, or four beats. |
| On End | Determines the action when a deck finishes playing a track (Jump Back and Pause, Jump Back and Play, Play Next Track, Load Next Track and Pause). By selecting "Play Next Track", Tau continuously plays tracks listed on the Track Browser, which can be useful before parties. In this mode, tracks are played in full from start to end without automix. |
| Auto Gain | Adjusts track volume to -10 decibels at the loudest parts. Tracks "hotter" than this are not adjusted. |
| Turn Off Pad + Main Fx | Turns off pad FX and main FX when a track is loaded. |
| Sync Mode On Load | Sets SYNC mode when a track is loaded. |
| Don't Save CUE While Paused | If enabled, only IN changes the cue point while paused. |
| Hot Cue Plays After Release | If enabled, a hot cue or loop starts continuous playback after release. |
| Keep Auto-Loop When Using Hot Cue Without Loop | If the track is looping and a hot cue is triggered without a loop, decide whether to keep the loop. |
| 8th Loop Is Trap | If enabled and a loop is stored at the 8th button, it becomes a "trap". When the music reaches the trap's start point, the loop activates automatically, preventing the music from progressing beyond the loop. This feature is especially useful for making short radio edits mixable at the end. |
| Pitch Bend Strength | Controls how quickly the tempo changes when nudging the track. |
| Pitch Bend Changes Tone | Enables time stretching (master tempo) by default for pitch bend, making nudging mostly unnoticeable. |
| Finer Pitch Bend for MIDI | Reduces pitch bend strength for jog wheels on MIDI controllers. |
| Invert Tempo Knob | Reverses the direction of the tempo fader, which speeds up towards the bottom and slows down towards the top, typical in most DJ hardware. |
| Invert Pitch Bend | Changes the direction of the pitch-bend click on the main waveform. |
| .005% Tempo Steps in ±4 and ±8 | Changes tempo steps to .005% in ±4 and ±8, enhancing precision beyond the default .01%. |
| Time Stretching Sound | Adjusts the algorithm for Key Lock (Master Tempo). |
| Hide Beatgrid | Turns off beat lines display on the waveform. |
| Disable Auto Master Deck | Disables automatic master deck selection. |
| Preview Search | Enable Preview Search for the Overview (Small) Waveform. |
| Key Notation | Selects preferred musical key display format (Camelot/Open Key/Musical). |
| Pad Fx | Adjusts order of pad Fx buttons. |
Output
Select the audio device and output channel routing here.
| Configuration | Choose between internal mixer, external mixer, or DJ split cable support. |
| Buffer Size | Adjust the audio latency. Increase this value if you experience audio dropouts. |
USB Audio And MIDI With iOS Devices
Unless your iOS device has a standard USB-C port, always use official adapters by Apple for the best compatibility and stability (such as the Lightning to USB3 Camera Adapter). Despite their small size, these adapters contain important electronics and software inside, so always opt for those made by Apple.
Since drivers cannot be developed for iOS devices, a USB device must be USB Class Compliant to be compatible with iOS. Unfortunately, not every USB device is designed according to this standard.
USB Class Compliant devices do not require a driver to be installed. A good indicator of class compliance is if the USB device works without needing a driver for macOS. However, USB Audio Class Compliance isn't a simple yes or no. The USB Audio Class is extensive, and no manufacturer has fully implemented it. It's so comprehensive that complete implementation isn't practical for any product. Apple has developed its subset of the USB Audio Class document, referred to as "true north" for manufacturers to follow, available as Tech Note 2274. If a product doesn't align perfectly with this subset, it may work with some iOS versions and not others.
iOS devices and the aforementioned adapters can provide only limited power, which may be insufficient for connected USB devices. Even if your USB device has its own power adapter, iOS may still display a "The connected USB device requires too much power" message. If you need to connect multiple USB devices or encounter power issues, use a powered USB hub. Prefer hubs with power adapters of 1A or greater and USB 3.0 compatibility (ensuring a modern chip). Here's how to connect:
- Connect the camera adapter to your iOS device.
- Connect the USB hub's "PC port" or "PC cable" (the one typically used for computer connections) to the camera adapter.
- Connect your USB MIDI or audio device with its USB cable to the USB hub.
iOS device → camera adapter → USB hub → USB devices
DVS - Timecode Vinyl and Audio Input
Tau supports most timecode formats in relative mode. Many users report great results with Serato or Traktor timecode vinyl. Serato is recommended for turntablists because Tau can seamlessly recover from a needle jump or heavily distorted signal, which often occurs during backspins.
Live audio input (pass-through, "thru") is also available to route external audio inputs into Tau. The effect chain and mixer controls remain usable with this feature, allowing you to apply effects to incoming audio and mix it like a regular deck.
A DVS signal is nothing special; it's simply an audio signal from a timecode vinyl or timecode CD. Any sound card can deliver it. Expensive "certified" sound cards are not necessarily better than others. "Certification" implies a quality check, but more importantly, it means higher profit for the manufacturer and a higher price for you.
Tau supports one or two inputs (turntables or CD players), and you can assign any deck to any input, including assigning multiple decks to the same input (to control multiple decks with one turntable).
Input, DVS
Set the audio input routing, adjust signal levels, and configure DVS settings here:
| Vinyl Frequency | Set to 1000 for Serato and 2400 for Traktor. |
| Signal Threshold | If the incoming signal is lower than this value, it will not be detected (considered as silence). |
| 45 rpm | Enable this if your control vinyl operates at 33 rpm but you want to use it at 45 rpm. |
| DVS Mode | Refer to the next section for details. |
| Player Assignment | Assign any of the two incoming DVS signals to any deck. A DVS signal can be assigned to multiple decks simultaneously. |
How to set up DVS
- Signal levels are crucial for a high-quality control signal. Ensure you understand the distinction between phono and line inputs and use them appropriately. For the Traktor Audio 6, adjust its settings permanently in the control panel app on your computer.
- Load a track into Player A.
- Connect your DVS hardware (turntables, sound card) to your device.
- Navigate to Settings/Input, DVS.
- Set your timecode frequency.
- If using iOS, tap Enable Audio Input. This grants audio input permission for Tau.
- Configure USB channels as necessary.
- Assign Input 1 to Player A.
- Test basic movements. If playback is in reverse, swap your turntable cables or enable Alternative Phase.
- Verify the signal strength indicator.
DVS Modes
There are 4 distinct modes to cover the needs of every DVS DJ:
1. Soft Relative DVS Mode
This is the default and most advanced DVS mode in Tau, offering a unique combination of features.
When DVS is activated for a player or sync is disabled for a DVS-controlled player, the DVS signal will not take control until the vinyl speed matches the playback speed. A message will prompt you to adjust the vinyl speed similar to MIDI Soft Takeover but for turntables.
When sync is enabled, set the turntable's tempo fader to 0. You can then nudge the vinyl for fine adjustments (pitch bend).
This mode is recommended for advanced turntablist techniques due to its strong drift/jump/skip protection.
| Pitch bend with sync | Yes |
| Smooth transition from sync to manual | Yes |
| Drift/jump/skip protection for Serato vinyl | Yes |
2. Sync Relative DVS Mode
This mode functions similarly to Traktor.
When DVS is enabled for a player or Sync is disabled for a DVS-controlled player, the DVS signal will be biased according to the player's current tempo. The bias range is up to 16%. Tapping the tempo value in Tau resets the bias to 0.
This mode is less suited for advanced turntablist techniques because drift/jump/skip protection is not active when the tempo is stable (during playback or while scratching).
| Pitch bend with sync | No |
| Smooth transition from sync to manual | Yes |
| Drift/jump/skip protection for Serato vinyl | Limited |
3. Simple Relative DVS Mode
This mode operates like traditional DJ software without sync switching or pitch bend features. It supports turntablist techniques due to its strong drift/jump/skip protection.
| Pitch bend with sync | No |
| Smooth transition from sync to manual | No |
| Drift/jump/skip protection for Serato vinyl | Yes |
4. Serato Absolute DVS Mode
In this mode, the player is fully controlled by the DVS signal, including the needle position on the vinyl. It is compatible only with Serato vinyls.
| Pitch bend with sync | No |
| Smooth transition from sync to manual | No |
| Drift/jump/skip protection for Serato vinyl | Drift only |
Live Player Assignment
This feature can be MIDI-mapped, integrating seamlessly into your turntablist performance. One turntable can control multiple players simultaneously.
THRU (Pass-through Audio)
Play regular vinyl through Tau. Enable DVS (for audio input), assign the input (1 or 2) to the deck, then hold Shift to reveal the THRU switch and click to enable. Tau will pass the incoming audio signal through to the deck's output. In this mode, the effect chain and mixer controls remain functional, allowing you to apply effects to the incoming audio and mix it like a regular deck.
Serato Needle/Timeout Protection
If the needle is near the edge of a Serato vinyl and begins to spin back, Tau displays a warning, potentially preventing a broken needle by allowing you to react promptly.
If the Serato timecode position is moving forward and nears the end, DVS automatically turns off, and playback continues without interruption.
MIDI
Tau offers a comprehensive set of MIDI functionalities, including a MIDI Monitor and a fully featured MIDI Mapping Editor. The MIDI Monitor is always visible on the right side of the settings panel, displaying the latest incoming MIDI messages.
What is a DJ MIDI controller, really?
It's essentially a large box with controls that send nothing but MIDI control messages to the DJ software. When you press a button, turn a knob, or move a fader, the MIDI controller transmits a short message in MIDI format over USB.
Everything else happens in the DJ software. Yet DJs often spend big money on controllers and comparatively less on DJ software. Isn't it ironic?
The DJ software can also send MIDI messages to the controller, illuminating LEDs. If the controller includes audio, it's essentially a sound card within the same housing.
MIDI mappings
The MIDI standard doesn't specify how to interpret a MIDI message. When the DJ software receives a MIDI message, it doesn't inherently know if you moved the crossfader or pressed the play button.
Therefore, a MIDI device only becomes fully functional when the DJ software has a specific mapping for it. Tau comes with factory mappings for many DJ MIDI controllers - plug and play!
You can customize the factory mappings or create your own MIDI mappings from scratch for any MIDI device.
There is no "MIDI mapping standard". Each DJ software has its own mapping format. Tau MIDI mappings use the .djpmap extension. DJ TechTools hosts a mapping community where you can search for mappings.
MIDI mappings should be placed (or downloaded) into Tau's Documents folder. Each connected MIDI device is managed separately, allowing you to use different mappings simultaneously.
MIDI Mapping Tips
A MIDI mappable feature may respond to various input messages. Some controllers, especially those designed for Serato, send different messages when the SHIFT button is pressed. In Tau, the SHIFT button is implemented in software, so you need to map all possible input variants.
Click on LEARN and follow the on-screen instructions - it's straightforward to "teach" a control!
Remember, changes take effect immediately but must be saved manually. Click the disk icon to save your mappings.
Mapping a Jog Wheel
Proper jog wheel operation requires mapping two messages: touch and move.
- First, map "Touch". Be careful to only touch and not move the jog wheel.
- Next, you can map "Move".
- Jog wheels send "ticks" while moving, similar to an old clock. If you continuously turn the jog wheel, you'll see an approximate number of ticks in the MIDI monitor.
Some controllers may send different messages for Touch and Move when the shift button is on. Other controllers may send different messages depending on whether the jog wheel is touched and moved or moved at the side (without touch).
Note: Your controller may have a "scratch" or "vinyl" button that can enable/disable the sending of the touch event. On some controllers, this button sends a MIDI message that you can map to "Jog Scratch/Bend". On other controllers, the button may also enable/disable the actual MIDI message for touch.
Mapping Pad Buttons
Please map the pad buttons to "Button Pad" (1 ... 8). Multiple MIDI input messages should be assigned to each button, as your controller sends different messages based on its "pad mode."
Ensure the "Pad Mode" selectors are also mapped. Additionally, you can map the LED outputs for each button pad. Different messages (colors) can be utilized to indicate various functions such as cue point, loop, delete, pad FX, auto loop, and stems.
Jog Cue Play
When enabled, touching the jog wheel returns to the current cue point.
Encoder Bend (CDJ)
On some Pioneer CDJ models, the outer ring doesn't send MIDI like a jog wheel but functions as an encoder. You can map pitch bend to an encoder like this.
Pad Mode
You can map up to 8 buttons to a "button pad", similar to the 8 buttons of the Points Control Area by default ("Cue"). You can change the button mode to "Cue" (8 points), "Loop" (1, 2, 4, 8, 16, 32, 64, 128 beats), "Stems" (Mute 1, Mute 2, Mute 3, Mute 4, FX 1, FX 2, FX 3, FX 4), and Fx (pad fx).
Init Sequence
After connecting a MIDI controller, the DJ software cannot "scan" it to get the actual status or position of all controls to match. However, some controllers can send the status or position of all controls if they receive a special and device-specific MIDI message. This is used to "initialize" a MIDI controller, obtaining the status or position of all controls when the controller is connected to Tau.
Tempo
If tempo is mapped to a Fader, Knob, etc. (not an Encoder or Button), reaching the physical limits of the fader or knob prevents further adjustment. Hold SHIFT after reaching the limit, and Tau will automatically extend the tempo range wider (e.g., ±4% becomes ±8%). You can freely adjust the physical control while holding SHIFT. Release SHIFT to resume normal control.
MIDI Clock, Ableton Link
Tau can send MIDI Clock and send/receive Ableton Link for synchronization with external devices or apps.
When the "Master Deck PLAY Re-Sync" setting is enabled and the master deck begins to play, Tau will force Ableton to re-sync the current session. In other words, Ableton will follow the master deck instead of the master deck following Ableton.
MIDI Devices
| Soft Takeover | If a control is moved on screen and it no longer matches the position of the hardware control, it will not update until the hardware control matches the on-screen value. |
| 4 Beats Jog Wheel | Unique feature for scratch DJs. Read more at DJWORX. |
Levels and VU Meters
Distortion-free audio with Tau is easy:
- During normal playback, if the green circle lights up, you're good; the level is optimal, so no worries.
- When applying effects or mixing multiple tracks, it's acceptable to briefly enter the yellow or even red zone.
The story behind Tau's unique meters
As you know, there are only two kinds of DJs:
- "The Good Guys" who take care to play around the reference, 0 db level. Always in the green, never in the red. (Sound technicians set up sound systems to this level.)
- "The Bad Guys" push it to the very last red LED, because it looks cool and they think it's louder. Despite the fact, that often there is a volume control in line AFTER their mixer, and the real loudness is in the hands of the sound technician.
With regard to loudness and levels, it bears repeating, digital audio is very different from analog audio.
Tau processes audio in the 32-bit floating point format, which has roughly -145 db precision in the ordinary audio range (-1.0f to 1.0f), and 42 db headroom above that. That's more than enough for studio grade audio and any kind of mixing you might want to do.
Remember, decibels are logarithmic. 6 db is 2x volume. 42 db headroom is far more than enough. (Most club sound systems will NOT amplify the mixer's line output by 42 db to the speaker cables...)
But digital audio will end up in some audio output with a limited range, for example, a sound card or an audio file (a recording). Despite of the great, almost limitless internal processing factors, the last step, the output must fit into the output's limits. If it doesn't, pure digital distortion will happen. Digital distortion sounds much worse than analog distortion: it crackles.
One might think the solution is easy, as we have -145 db precision: reserve a broad range for the headroom (such as 25 db), and the rest (120 db) for regular audio. But the output of the sound card or the loudness of the recording would become too low this way, relative to other applications or tracks.
Analog DJ mixers have a simple trick for the loudness problem: they have powerful pre-amps inside, and when "the bad guys play in the red" at the maximum volume, the pre-amps usually remain below the distortion threshold. In other words, analog DJ mixers have been designed to handle the bad guys.
Most DJ applications solve this problem a bit differently. Namely, they employ a limiter. But our approach is different than most so we can get you clean sound all the time: Tau's solution is based on how DJs actually see the VU meter.
| The Good Guy POV | The Bad Guy POV |
|---|
| ⬤ |
Audio is being played. Nothing to worry about. |
Boring! |
| ⬤ |
Good levels and loud enough. Maybe approaching louder than it should be. I'll keep my eye on it. |
We're getting somewhere. But it's still not loud enough. Let's do this! * cranks volume up * |
| ⬤ |
Distortion, too loud. Let's back it down a bit. |
NOW it looks great. I'm the best fucking DJ in the world! * FIST PUMP * |
As you can see, most of the segments of the VU meter aren't actually useful for a DJ -- although they look good when they light up -- because DJing is not music production, where those segments matter a lot.
The loudness meters in Tau have been simplified and are represented by two circles. This system is designed to have the reference, 0 db level to look the best, encouraging DJs to play around there.
The circle on the right shows levels below the reference. The main purpose of this circle is to show "some audio is being played".
The circle on the left shows levels equal or above the reference, 0 db level. Green is good, yellow is "okay" (with accent), red is "too much".
Tau provides 6 db headroom above the reference level, and also has a hard-knee clipper above 3 db. Don't be fooled by the moniker, "hard-knee", it actually sounds transparent and smooth. If you play within the "green" channel meters, mixing will not give you any trouble as the signal will rarely approach the clipper.
The left circle changes to red if the signal nears the clipper. If you somehow reach 6 db, you are still within the range of any sound card or output audio format. When both circle's are red, you are outside the range and digital distortion will likely occur.
The tests with our beta testers showed that there is absolutely zero learning curve with this new DJ VU meter system. Nobody had any problems with it.
Yes, the two circles could have been simplified further to just one circle. But our prototypes showed that it's much harder to perceive and act upon -- the small illusion of "movement" from the right circle to the left is a great mechanism for maximum visibility. And finally, the distortion levels look ugly, as they should.
Keyboard Shortcuts
The key positions are indicated according to the US keyboard layout. Your keyboard localization might be different, but the key positions should be largely similar.
| Player A | Player B |
|---|
| Play/Pause | Z | N |
| Cue | A | H |
| Loop | D | K |
| Sync | Q | Y |
| Bend+ | E | I |
| Bend- | W | U |
| Point 1 | 1 | 6 |
| Point 2 | 2 | 7 |
| Point 3 | 3 | 8 |
| Point 4 | 4 | 9 |
There is no keyboard control for Player C and D. Use the SHIFT key (left or right) for shift. Track browser controls:
| Close | Escape |
| Load A | Shift + Left Arrow |
| Load B | Shift + Right Arrow |
| Search | Shift + F |
| Back | Backspace |
Migrating from DJ Player Professional
After 15 years and countless updates, DJ Player Professional has been discontinued and replaced by Tau. There are significant differences between the two; here are the major ones:
- Tau is based on fundamentally different technology, allowing it to run on more platforms.
- Refreshed look and feel.
- Deck Effects have been replaced by Color Fx and Main Fx, bridging the gap to other DJ gear.
- Supports motorized MIDI controllers. Factory mapping included for the Rane ONE.
- Improved track browser workflow with faster previews.
- Cloud Folder for backing up and syncing your metadata and MIDI maps.
- No subscriptions, no in-app purchases, no hidden fees, no paid features. Just a single price tag.
Current DJ Player Professional subscriptions will remain active until their respective expiration dates. Tau installs as a completely separate application, ensuring it does not interfere with your DJ Player app.
How To Transfer Your Data From DJ Player
- Go to Settings/Database, Cloud Folder in Tau.
- Use the Import feature to bring in your cue points, BPM, beatgrid, and key from DJ Player.
- If you have custom MIDI mappings, open Tau's App Documents folder and copy your .djpmap MIDI mapping files from DJ Player's Documents folder into Tau's Documents folder.
Privacy
Personal information refers to data that can be used to identify or contact an individual. Tau prioritizes your privacy and DOES NOT engage in the following activities:
- Collecting, storing, transmitting, or handling personal information.
- Accessing your address book, social media, email, or other account data.
- Using any location services or data.
- Utilizing or handling any advertisement technology, advertisements, or unique device identifiers.
- Sending push notifications.
All your settings, cue points, and other music-related metadata are saved in Tau's Documents folder on your local machine. Your data remains entirely under your control.
Tau collects, stores, and transmits crash logs using the Sentry platform to facilitate bug fixes. These crash logs DO NOT contain any personal information or unique device identification.
Refund
All payments are processed by Apple or Microsoft through their respective application stores. I do not handle or have access to any customer information. Therefore, any refund requests must be directed to Apple or Microsoft.

 Windows 10+
 macOS 14+
 iOS 17.4+